Tuesday, November 5, 2013

Rice Krispie Treat Pumpkins

We made these for my son's preschool Halloween treat.

Ingredients Needed
6 cups rice krispies
6 Tbsp butter (NOT 3 like the box says)
40 regular sized marshmallows
red and yellow food coloring
mini tootsie rolls (midgets)

Melt 6 Tbsp butter in a non-stick pan over low heat. (Note - Use 6 tbsp instead of the 3 called for on the box because they will yield much softer treats that won't turn into bricks when cooled.) Add in marshmallows and stir until melted. Add a few drops of yellow food coloring and 1-2 drops red food coloring to turn the marshmallows into the desired orange color. (We didn't use very much because I didn't need mine to be crazy bright orange).
 Remove the pan from heat and quickly add in the 6 cups of rice krispies. (It pays to pre-measure these in a separate bowl so you can add them to the pan all at once.)  Stir quickly to mix all the marshmallow and krispies together.
Press a heaping mound into a mini muffin tin. Press a tootsie roll halfway into the mound. Let cool for a few minutes. Then carefully remove the krispie treat and slightly reshape the bottom into a rounded pumpkin shape. Let cool completely on wax paper.


 If you are feeling ambitious, I've seen some pipe green frosting leaves.  I didn't do this because we packaged them up in individual little plastic bags and the frosting would have smeared all over.

Friday, October 25, 2013

Fall leaves Project.

We did a fall leaves project where the kids collected colored leaves, glued a tree trunk and branches (that I cut out from brown construction paper) onto a blue piece of construction paper and then glued the leaves on.  They had fun doing it and we used materials we already had around the house!

Materials Needed
Brown construction paper
Blue construction paper
scissors
glue
Fall leaves (freshly collected. Dried ones won't work as well.)


Thursday, October 3, 2013

Halloween T-shirts

My daughter is invited to a birthday party on Saturday and she was asked to wear "Halloween colors" or clothes. Looking in her closet, I realized she didn't have anything orange or black or remotely "Halloweeny".  I didn't want to spend a lot on the cute, but pricey Halloween shirts  on Etsy. My sewing machine is on the fritz, so I that took sewing out of the equation. I decided to do a quick iron-on pumpkin on an orange T-shirt. Super easy. Super quick. Super cheap. 
I found kid-sized orange T-shirts at Jo-Ann Fabrics (and on sale too!) I purchased 1/4 yard of orange striped fabric and used brown and green scraps of fabric that I already had.  I pre-washed them to prevent shrinking issues when the shirt is washed.
I then ironed wonder-under onto the fabric, and cut out a pumpkin shape with stem and a leaf.  Following the wonder-under instructions, I ironed the pumpkin onto the T-shirt and voila!
I thought the pumpkin potentially looked too girly for my boys, so I used some black fabric and wonder-under to make them jack-o-lantern shirts.


Monday, March 18, 2013

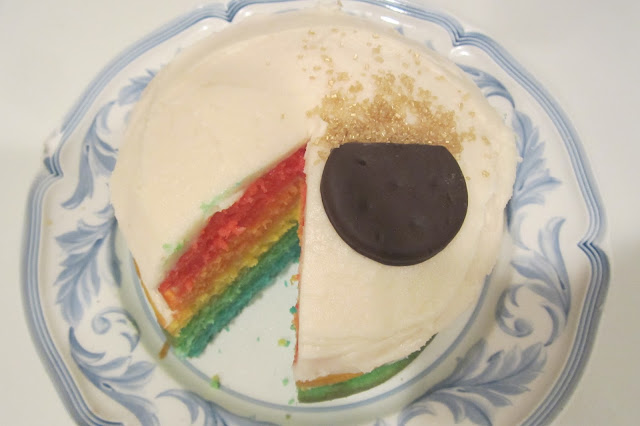
Rainbow cake with a pot of gold!

For St Patrick's day, we made a rainbow cake with a pot of gold on top!
 
Instructions
Step 1. Make your favorite yellow cake batter.  From scratch. From a mix. It doesn't matter.  If you do use a mix, always use the "butter yellow" version. It tastes much better. Don't even buy white cake mix...in my opinion it tastes terrible!
If you are going to make a 8 or 9 inch round cake, then make the whole mix.
If you are going to make a small cake (I used two 6 inch cake pans ), then you only need to use half the mix or recipe.
Step 2. Divide the batter evenly into 5 bowls.  (Yes - I know this makes a lot of dishes, but the end result is worth it!)
Step 3. Using food coloring, dye one bowl of batter red, one orange, one yellow, one green, and one blue.  Stir each portion of batter well to evenly distribute the food coloring.
Step 4. Grease the bottom of your pan. Cut a circle of parchment paper into a circle and line the bottom of your pan. Grease the top of the parchment as well.
Step 5. Pour one color batter into your pan and bake until cake bounces back in the center when gently touched or a toothpick comes out clean.  If you have 2 pans of the same size, you can obviously bake 2 colors at the same time.  Note - the baking time will be shorter than the time listed on the box or in the recipe because you are using significantly less batter  in the pan than normal because you are making each layer separately.  I baked each 6 inch cake layer about 10 minutes.
Step 6.  Let the cake cool slightly. Remove from the pan and let cool completely on a rack.  Once the pan is cool enough, put a new parchment paper in, grease it, and bake the next color batter.
Repeat this until all of the layers have been baked.
Step 7. Once the cake layers are cooled down, make your favorite frosting. (Thicker frosting works better with so many layers. ) I suggest this icing.   http://www.epicurious.com/recipes/food/views/Amy-Sedariss-Vanilla-Buttercream-Frosting-236126
Be aware, there are much less "sugary" icings out there, but this one holds up well to the multiple layers and to hotter temperatures.

Step 8. Put the blue layer down. Frost lightly with frosting. Then layer the green on top. Frost. Layer with yellow. Frost. Layer with orange. Frost. Layer with red. You can then frost the top and the sides of the cake for the most finished look. (I didn't want to fuss with the sides, so I just frosted the top. )

Step 9 I cut off the top of a thin mint cookie, and sprinkled gold sprinkles as if they were spilling out of the pot of gold. (I just happened to have gold sprinkles on hand from a prior project. You can use yellow sprinkles or something similar.)
Step 10: When you cut into the cake, it looks really cool and the rainbow really pops!
 

Saturday, March 16, 2013

Cinnamon Sugar Tortilla Crisp Snowflakes!

Today we made cinnamon sugar snowflake tortilla crisps. It's the perfect thing to make with leftover tortillas!

- Adjust your oven rack to the center of the oven.. Preheat your oven to 350 degrees Fahrenheit.
- Melt 3 or 4 tbsp. butter in a small bowl. In another bowl mix 1/2 cup sugar, 2 or 3 teaspoons .
Combine the sugar and cinnamon, stirring until well blended.

- To make snowflakes, fold the tortilla in half, and then in half again.

- Cut as you would a paper snowflake, cutting out shapes, but keeping parts of the seams intact. Carefully, open tortillas back up.

- Or, for simple wedges instead of snowflakes, cut a stack of 6 or 8 flour or corn tortillas into wedges, as you would a pizza, using a pizza cutter, or kitchen shears.  

- Lay the tortillas out on a cookie sheet, arranging them so they don't touch. Brush one side of the tortillas with melted butter. Sprinkle the chips with the sugar and cinnamon mixture. Flip them over and brush the other side with melted butter and sprinkle with the cinnamon sugar.

- Bake the chips for approximately 6 to 8 minutes, shaking the pan gently after about 4 minutes to prevent sticking. Watch the chips carefully to avoid burning; the chips will turn a light, golden brown when finished.

Serve warm or cool.


Thursday, January 31, 2013

Going to the Chicago Museums...for free or cheaper...

These could change at any point, so please check the museum's website to make sure their policy is still the same.

Bank of America Free Days

Have a Bank of America card? Then on the first full weekend of each month present your card and get a free admission to The Art Institute of Chicago, the Adler Planetarium, the Chicago History Museum, the Museum of Contemporary Art Chicago and the Shedd Aquarium. One per cardholder, so it won't be free for the entire family (unless each of your children have a B of A credit card), but a free adult admission is nothing to sneeze at.
Check out Bank of America website.

Adler Planetarium

January 2013: 8-9, 14-17, 28-31
February 2013: 5-6, 11-14, 19-20, 25-28
1300 S. Lake Shore Drive Chicago (312) 922-STAR (7827)
See all exhibits and special events at the Adler Planetarium

Art Institute of Chicago

Free for all Illinois residents weekdays from Jan. 7-Feb. 13, 2013. Also free first and second Wednesday of the month for Illinois residents.


159 E. Monroe Chicago (312) 443-3600
See all exhibits and special events at the Art Institute of Chicago


Chicago Children's Museum

Always free: 5-8 p.m. every Thursday and the first Sunday of every month for kids 15 and under. Always free to children under 1.
Print a coupon for $1.00 off admissions
700 E. Grand Ave. at Navy Pier Chicago (312) 527-1000
See all exhibits and special events at the Chicago Children's Museum


Chicago History Museum

Free: Jan. 21, Feb. 4-28.
1601 North Clark St. Chicago (312) 642-4600
See all exhibits and special events at the Chicago History Museum


Field Museum

January 7, 8, 15, 16, 17, 18, 22, 28, 30
1400 S. Lake Shore Drive Chicago (312) 922-9410
See all exhibits and special events at the Field Museum


Museum of Contemporary Art

Always free: Tuesdays 10 a.m.-8 p.m.; children 12 and under are free every day.
220 E. Chicago Ave. Chicago (312) 280-2660
See all exhibits and special events at the Museum of Contemporary Art


Museum of Science and Industry

January 2013: Beginning Jan. 7, weekdays are free.
February 2013: 6, 13, 20, 27
March 2013: 4
April 2013: 22
May 2013:6
June 2013: 3-7, 10
September 2013 9-13; 16-20; 23-27, 30
October 2013 1-2
November 2013: 4
December 2013: 9.
5700 S. Lake Shore Drive Chicago (773) 684-1414
See all exhibits and special events at the Museum of Science and Industry


John G. Shedd Aquarium

2013 free days
January: 7, 8, 14, 15, 20, 21, 22, 28, 29
February: 4, 5, 11, 12, 17, 18, 19, 25, 26
March: 4, 5,11, 12, 18, 19, 25, 26
June: 3, 4, 10, 11, 17, 18
September: 2, 9, 16, 23, 30
October: 7, 14, 21, 28
November: 4, 11, 18, 25
December: 2, 9, 16, 23, 30
Always free: The first full weekend of every month (Bank of America weekend, see below)
Bank of America Weekend:
On the first full weekend of the month, present your Bank of America/Merrill Lynch ATM, credit or debit card, along with photo ID, and receive one free mini-pass admission, valid for the cardholder only. This offer is not valid during special events or for admission to the 4-D theater. Upgrade your ticket to include the Abbott Oceanrium for an additional $6.95.
1200 S. Lake Shore Drive Chicago (312) 939-2438
See all exhibits and special events at the John G. Shedd Aquarium

Peggy Notebaert Nature Museum

Thursdays are free for Illinois residents. Children under 3 are free every day.
2430 N. Cannon Drive Chicago (773) 755-5100
See all exhibits and special events at the Peggy Notebaert Nature Museum


Free Days at Brookfield Zoo

Children's Zoo is free through Dec. 31, 2012. Free general zoo admission is offered on Tuesdays and Thursdays through the end of February 2013. Beginning in January and through the end of February, admission is also free on Sundays and Saturdays.
8400 31st St. Brookfield (708) 688-8000

Easy Pajama Pants

To prepare for winter this year, I made the kids new jammie pants! A lot of the pajamas you buy are like compression-suits... skin tight, not so comfy, and made out of gross fire-retardant fabric.
So, I followed this lady's instructions and made the kids some new jammie pants.
http://www.instructables.com/id/How-to-Sew-Your-Own-Pajama-Pants/?ALLSTEPS

They were really simple to make and they love them! Austin was thrilled to have "raffy pants" that match his giraffe lovey. :)

Friday, January 25, 2013

Three Little Pigs Day


Three Little Pigs Day

On Monday, we had a "Three Little Pigs" day. We started by reading the "Three Little Pigs" story. Then we took an old cereal box, cut out a long rectangle for the walls and a smaller rectangle for the roof. We folded and glued to make little cardboard houses. The kids then glued cut up yellow yarn to make "straw houses". I drew a pig, they colored it pink, and we cut it out and glued it onto the house. -Voila - the first little pig in his straw house.


We then made "stick houses" out of lincoln logs.
Using another old cereal box, I made a larger house which Caroline colored red. I helped her draw the "bricks" with permanent marker.
 
To make this house, you are basically cutting out the below shape (all in one piece. The lines are for measuring and folding). You will want to use a ruler to make sure your front and back are the same dimensions, as well as your 2 sides. ) Then fold and glue or tape together. You can then add on more pieces to make the house more "fancy" if you desire. 
 
We capped off our three little pigs day with piggy pancakes for lunch...( a larger pancake, a small pancake for the nose, 2 quarters of a small pancake for the ears, and chocolae chips for the snout holes and eyes. )