Sunday, October 7, 2012

New Aprons!

I made Caroline a new apron to wear when we're out to dinner and she's wearing a nice dress. (Eating and keeping her clothes clean is not a skill she's mastered yet....although truthfully, I don't know that I have mastered it either!)
I decided to follow a cute pattern instead of just winging it like I have in the past.
I made the top a bit too big, but really like how it turned out.

This is the pattern I used (with a slightly modified back).

This purple apron I made for my sister-in-law's niece. It was pretty easy and quick and would recommend this for a good everyday apron. It's basically a chef's apron that I added a gathered skirt to to make it a bit more girly.

How to Make it...
Modified Chef’s Apron with gathered skirt.
Cut 4 4 inch X 22 inch strips for the top straps and side straps.
For each strap, Fold it in half, right sides together. Stitch along the long end. Pull right side out. Press. Fold in one end of the strap and sew to finish it off.  Do this with all four strips.
Cut out 2 “top half” pieces of the chef’s apron, with about 2 inches below the part where you attach the side straps (instead of the full length you see below).  It’s best to cut it out of newspaper first, put it up to your child, adjust, and then cut.
You can see an example of the chef's pattern shape here -
When you cut the pattern out of fabric, allow about ½ inch for your seam allowance.
 
With the right side of one of the unfolded apron pieces facing up, lay the apron strings in the appropriate places, facing IN, raw edges matching and strings toward the center. Pin them in place as shown below in the picture above. Lay the other apron piece on top, right sides facing. Stitch along both sides and the top leaving the bottom open.
 
Cut a large rectangle for the skirt.  Fold over the sides twice and sew. Add a different color at the botton if you wish (about a 4 inch piece and the folded over.)
Gather the skirt. Fold the bottom part of the top under. Adjust gathers of the skirt and insert into the top with folds going over the gathers. Sew along bottom folded edge of the top to attach the skirt to the top of the apron. .

Monday, August 13, 2012

Olympics Party

We were invited to an Olympics party this past week.
The host made cute paper olympic torches with colored tissue paper stuffed inside white paper.
I made Olympic ring headbands for the girls (foam circles hot glued to eachother and then onto a headband) and olympic visors for the boys.

You can decorate with paper fan olympic rings.

I made an olympic fruit platter with watermelon stars (courtesy of my star cookie cutter), pineapple rings, and blueberries.

Tuesday, April 24, 2012

Making apple slices that don't brown!

Making apple slices that don't brown!


For Clayton's preschool class last week, I was assigned the task of providing a fruit snack for the class. Clayton requested apple slices with caramel dip. And thus my dilemna - how do I prepare apple slices for 22 kids, two hours ahead of time without them turning brown (and without having to buy a dozen lemons).
The answer? Seven-Up! Pour some Seven-Up in a large bowl or tupperware. As you slice the apples, toss them in the bowl of Seven-up. Keep the apples submerged in Seven-Up until you are ready to serve them. Drain the Seven-Up and rinse the apples with water and you have freshly cut apples that aren't brown!

Letter Signs


I've been wanting to hang something on the wall above the beds in the boys' room, but have yet to find anything that's I like that's not really expensive.
I saw this sign on Pinterest and it inspired me to make similar ones for the boys.
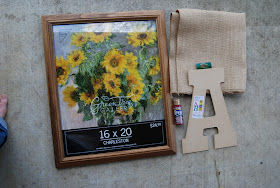
I picked up a cheap frame, some burlap, some red paint, and wooden letters from Hobby Lobby.

I took the glass and cardboard out of the frame and painted it. (I used a small bottle of FolkArt paint).  I painted the wooden letter (resting it on wax paper so it didn't stick like it would to newspaper).

While the paint was drying, I cut the burlap a few inches larger than the frame and ironed it so it didn't have any wrinkles.  I turned the frame over, backside up, and rested the burlap over the frame. I pushed the cardboard into the frame and gently pulled the burlap so it was flat in the front.
 I then folded the burlap over the cardboard and hot-glued it down. I pushed down the frame tabs (the little things that keep the cardboard in the frame.
 Next, I hotglued the letter to the burlap, and voila! - artwork for above the boys' beds!
Yeah! Their room is finally starting to look decorated!

Monday, April 16, 2012

Labels for your pantry!

My pantry was a disaster and it was driving me crazy. So, I finally found time to clean it out - throw away stuff that was old or that was never going to get eaten, wipe away any spills or crumbs, and put certain pantry staples into cute containers.  You can get cute containers at a variety of different stores. I already had a few glass containers that I liked, but was able to buy a few more at Hobby Lobby. (Who knew they had such a variety of great containers!?)
I then printed out free (and adorable) labels from Better Homes and Gardens. I had them laminated at Office Depot for about 1$ and hot-glued or sticky-tacked them to my containers. My pantry looks SO much better!

Easter Wreath

For Easter this year, I made an Easter wreath. I'm always afraid to use the fake flowers because they so often start to look cheesy, and using fresh flowers are cost-prohibitive.  Luckily, I found these flowers on sale at Michaels that are made from natural materials. They look similar to dried flowers but are much harder and more durable.  I bought a simple stick wreath and stuck in/hot-glued the natural flowers. I then cut a simple wooden dowel into the right sizes for my cross, hot-glued them together, and then further secured them with a natural-colored rope.  I stuck the cross into the branches at the bottom of the wreath, and voila!

Make an Easter garden

To help make Easter focused on Jesus' resurrection and not eggs and bunnies, we made an Easter garden.
Find a shallow pot, flower pot bottom, (or in this case a basket with a tin baking pan at the bottom since it's what we had on hand.) Cover the bottom with dirt or potting soil. Bury a mini flower pot placed on its side to represent the tomb. Find a larger stone about the same size as the pot opening. Make 3 crosses to signify the crosses at Calvary.  Find some relatively straight sticks, break to size, and tie together  to make crosses.  Plant shade grass seed in the dirt and cover with another layer of dirt. Stick the crosses in the dirt. Layer pebbles in front of the "tomb".  You can print out a picture of Jesus and put it in the tomb and put the stone in front of the tomb opening.  On Easter morning, have the kids roll the stone away and reveal that it is empty and that Jesus has risen! (Make sure to remember to remove the paper Jesus the night before!)
It's best to plant this about a week to a week and a half before Easter so the grass starts growing in time. Make sure to spray it with water and keep it moist a few times a day. (The kids LOVE to do this.)

Thursday, February 23, 2012

How to make circle paper fans

Here are instructions on how to make circle paper fans. 
These are great for decorations at any type of party.  They can be placed on tables, hung to adorn windows, hung on doors,  hung on walls, hung from the ceiling, etc. .
Choose pieces of scrapbook paper that fit your style/theme/colors.
You will need 2 - 3 pieces of the big square scrapbook paper for each fan.

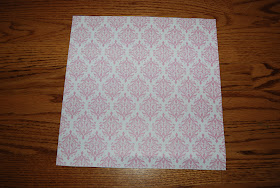
Step 1: Take your piece of square scrapbook paper. Fold it accordian style with your folds being no wider than 3/4 - 1 inch. (If you make smaller folds, you will only need 2 pieces of paper. If the folds are wider/bigger, you will need 3 pieces of paper.)

 Step 2: Cut the paper in half along one of the folds.


Step 3:Fold the folded paper in half as shown.

Press the ends of the inner folded paper together and hot glue or staple it together. (It should form a semi-circle. ) Do the same with the other half of the paper. You should now have 2 semi-circles. Hot glue or staple the 2 semicircles together to form a circle. 
You can hole punch and hang with ribbon or hang by thread.


To make small fans, cut a piece of scrapbook paper in quarters. You can use 2 small squares to make a mini circle fan.

To make a double sided fan, put 2 pieces of paper back to back (wrong sides together) and make per instructions.


Tuesday, February 21, 2012

Valentine's ideas for food, activities, homemade valentines, and decorations.
http://homewithlindsay.blogspot.com/p/valentines-day-crafts-recipes-and-ideas.html

Thursday, February 16, 2012

Superbowl Activities

There are come fun football worksheets out there. My kids really liked this one - http://www.printactivities.com/Mazes/Math-Mazes/Football-CountingBy1s.shtml

Game Idea - Pin the football in the goalposts
We played "pin the football in the goalposts", a play on the classic pin-the-tail-on-the-donkey game.
Cut out a goal post out of construction paper and tape to a wall, window, or poster board.
Cut out little brown footballs. Blindfold the kids, spin them, and let them see if they can score a field goal!

Fun Football Food Ideas
Football brownies! I think boxed brownies are gross and most of the "recipes" out there call for a box mix when making these.  Try "Katherine Hepburn Brownies".   They take only a few more minutes than a box mix and are a million times better.   

Tub paints

Last week, I made tub paints (with food coloring, dish soap, and cornstarch). The kids had a blast painting in the tub!

**Be careful! The tub gets very slippery!

French Toast Rollers

The Sneaky Chef tried this kid recipe with her children and they loved it.
I finally tried it on mine and they loved it too!
It's a fun twist on french toast - rolled up style!
Here is the recipe (with a few alterations)...

French Toast Rollers
3 large eggs
¼ cup milk
¼ tsp cinnamon
¼ tsp salt
½ tsp vanilla
6 slices bread

In a large shallow baking dish, whisk together the eggs, milk, cinnamon, salt, and vanilla. Set aside. Using a rolling pin, roll out each slice of bread on a cutting board until flattened. If desired, spread 2 tbsp filling on each flattened bread, keeping about ¼ inch away from edges. Roll up each slice of bread, pressing to seal the edges. Dip each log in the egg mixture until saturated on all sides, then cook in a well greased skillet over moderate heat, turning to brown each side. Remove from heat and dust with powdered sugar.

Optional fillings –
- 1 tbsp peanut butter,
- 1 mashed banana, nutella,
- 1 tbsp cream cheese + 1 tbsp jam,
- granola (to make a crunchy rollup).

Dancing Raisins

We tried a science experiment and made "dancing raisins".
You turn on your favorite music (for the effect), pour 7-up into a tall glass, then throw in a few raisins. Then watch them "dance".
Here are more details and the science behind the experiment...